
- Step 1: Marinate the Chicken
Combine the chicken pieces in a large bowl with soy sauce, crushed garlic, black peppercorns, and bay leaves. Toss everything together thoroughly so each piece is generously coated with the marinade. The salt in the soy sauce begins to brine and season the meat from the moment it makes contact, drawing flavor deep into the muscle fibers. Allow the chicken to marinate for a minimum of 30 minutes at room temperature — though overnight in the refrigerator will produce a noticeably richer, more deeply flavored result. When you are ready to cook, remove the chicken from the marinade and set it on a clean plate. Always reserve the marinade liquid; it forms the essential base of the braising sauce in the following steps and should never be discarded.
- Step 2: Sear the Chicken Pieces
In a wide, heavy-bottomed pan or Dutch oven, heat the cooking oil over medium-high heat until it shimmers visibly. Carefully place the marinated chicken pieces skin-side down in a single layer, avoiding any crowding that would cause steaming rather than searing. Cook undisturbed for 3 to 4 minutes until the skin develops a rich, deep golden-brown crust with crispy, rendered edges. Flip and sear the other side for an additional 2 to 3 minutes. This browning step creates the Maillard reaction — the chemical process responsible for the complex, roasted, nutty flavors that elevate adobo from simple braised chicken to something extraordinary. Once all pieces are beautifully seared, transfer them to a plate while keeping the flavorful rendered drippings in the pan.
- Step 3: Build the Braising Base
With the heat still on medium, pour the reserved marinade, vinegar, and water directly into the pan. Use a wooden spoon to scrape up all the golden-brown fond from the bottom — this layer carries concentrated flavor and should not be left behind. Bring the liquid to a rolling boil and allow the vinegar to cook uncovered for 2 full minutes without stirring. This crucial step dissipates the sharpest volatile acids in the vinegar, mellowing its harsh edge into a clean, rounded acidity. You will notice the aggressive vinegar aroma gradually softening into something more nuanced and appetizing. Once the vinegar has cooked down, return the seared chicken pieces to the pan and nestle them snugly into the braising liquid before moving on to the long, gentle braise.
- Step 4: Braise Until Tender
Reduce the heat to low, loosely cover the pan, and allow the chicken to braise gently for 25 minutes, turning the pieces once at the halfway mark to ensure even cooking. The low, steady heat works slowly to break down the connective tissues in the chicken, transforming even the toughest thigh meat into something fork-tender and yielding. Keep a close eye on the liquid level — it should remain at roughly one-third depth throughout the braise. If it reduces too quickly, add small splashes of water to maintain the level. At this stage, the kitchen fills with the intoxicating aroma of garlic, vinegar, and soy sauce gently mingling together — one of the most deeply comforting smells in all of Filipino cooking. The chicken is ready for the next step when it pulls cleanly from the bone.
- Step 5: Pour in the Coconut Milk
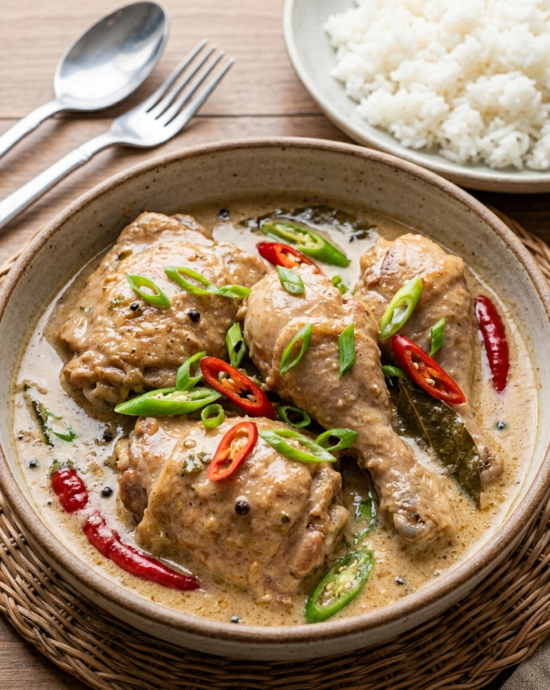
Once the chicken is tender and cooked through, add the whole green finger chilies to the pan and pour in the coconut milk in a slow, steady stream, stirring gently to incorporate it evenly into the braising liquid. The coconut milk immediately transforms the sauce — the sharp acidity softens noticeably, the color shifts from dark mahogany to a warm, creamy ivory, and the sauce takes on a lush, silky body. Increase the heat to medium and allow the coconut milk to simmer uncovered, stirring occasionally to prevent scorching on the bottom of the pan. Taste and adjust seasoning with fish sauce at this point, adding it gradually — a little patis goes a long way in deepening the umami complexity of the finished sauce without adding any noticeable fishy taste.
- Step 6: Reduce and Finish
Continue simmering the coconut milk sauce over medium heat for 10 to 12 minutes, stirring occasionally, until it thickens into a creamy, luscious coating sauce that clings generously to each piece of chicken. Watch the heat carefully during this stage — coconut milk can curdle or scorch if exposed to too high a temperature for too long. Keep it at a gentle, steady simmer rather than a vigorous boil. As the sauce reduces, it deepens in color slightly and develops a richer, more concentrated coconut-adobo flavor that is uniquely mouthwatering. Once the sauce reaches your desired consistency, remove the pan from heat and allow the dish to rest for 5 minutes before serving. Discard bay leaves and adjust seasoning one final time before plating generously over steaming white rice.
- Calories:400 kcal20%
- Energy:1,674 kj20%
- Protein:28 g56%
- Carbohydrates:8 g3%
- Sugar:2 g2%
- Salt:1.3 g22%
- Fat:28 g36%
Table of Contents
What Is Chicken Adobo sa Gata?
Chicken adobo sa gata is a Filipino braised chicken dish that combines the bold, tangy foundations of the classic chicken adobo with the rich, velvety creaminess of coconut milk, creating one of the most complex and satisfying iterations of the beloved national dish. The word gata in Filipino refers to coconut milk — the extracted liquid from freshly grated mature coconut flesh — and its addition to the traditional adobo formula is a culinary evolution rooted in the coconut-rich provinces of the Philippines, particularly the Bicol region and parts of the Visayas, where coconut trees are both abundant and culturally significant.
What makes adobo sa gata so remarkable is the way coconut milk fundamentally transforms the dish’s character while honoring its adobo identity. The sharp acidity of vinegar, which dominates classic adobo, is cushioned and rounded by the natural sweetness and fat content of the coconut milk. The result is a sauce that is simultaneously tangy, savory, creamy, and subtly sweet — with a richness that coats the palate in the most satisfying way. Green finger chilies (siling haba) are almost always added, their mild heat cutting through the fat and adding another dimension of flavor complexity.
From a culinary technique standpoint, adobo sa gata requires slightly more attention than the classic version because coconut milk must be managed carefully — simmered gently rather than boiled aggressively to prevent curdling. The patience required is always rewarded. The finished dish is richer, more filling, and arguably more celebratory in character than classic adobo, making it a popular choice for family gatherings and special occasions across the Filipino archipelago.
For anyone already familiar with chicken adobo, adobo sa gata is the natural, irresistible next step — familiar yet revelatory.
Ingredient Notes
- Coconut Milk (Gata): Use full-fat coconut milk for the richest, most authentic sauce. Freshly squeezed gata from a grated mature coconut (niyog) is the gold standard — its flavor is sweeter and more complex than canned versions. If using canned, choose a brand with no additives; refrigerate unused portions for up to 3 days.
- Green Finger Chilies (Siling Haba): These mild, long green chilies add fragrant, herbaceous heat without the fire of bird’s eye chilies. They are left whole during cooking to gently perfume the sauce rather than aggressively spice it — pierce them lightly with a fork to release more of their flavor if you prefer a slightly spicier finish.
- Fish Sauce (Patis): A small splash of patis in the final stage deepens the umami profile of the coconut milk sauce dramatically. Use it as a final seasoning rather than cooking it in from the start — this preserves its bright, complex flavor. Look for Rufina Patis or Tiparos for the best quality.
- Chicken (Bone-In): Bone-in, skin-on thighs and drumsticks are ideal because the bones contribute gelatin to the sauce during braising, giving the coconut milk sauce extra body. Avoid boneless breast meat, which tends to dry out during the long braise.
Ingredient Suggestions
- Spinach or malunggay leaves — Stir in a handful in the final 2 minutes for color, nutrition, and a subtle earthy contrast to the rich coconut sauce.
- Lemongrass stalks — Add 1–2 bruised stalks while braising for a citrusy, aromatic top note that pairs beautifully with coconut milk.
- Shrimp paste (bagoong) — A teaspoon stirred into the braising base adds deeply funky, savory depth beloved in Bicolano cooking.
- Potatoes or taro (gabi) — These starchy additions absorb the creamy coconut sauce extraordinarily well, making the dish more substantial.
- Bird’s eye chilies (siling labuyo) — Swap or supplement the finger chilies with labuyo for a proper Bicolano-style fiery kick.
Helpful Tips & Pro Tips
- Never boil coconut milk at high heat. The fat in coconut milk separates and curdles when exposed to aggressive, rolling heat. Keep the simmer gentle and consistent — small, lazy bubbles at the edges of the pan are exactly what you want.
- Add coconut milk only after the vinegar has fully cooked through. Introducing coconut milk too early means it simmers alongside harsh raw vinegar, which can cause the sauce to split and taste unbalanced. The vinegar must be mellowed first before the gata goes in.
- Why is my adobo sa gata sauce too thin? If the sauce isn’t thickening, simmer uncovered over medium heat for a few additional minutes. The natural starches from the garlic, combined with the fat from the coconut milk, will gradually thicken the sauce as moisture evaporates — patience is key.
- Taste before adding salt. Both soy sauce and fish sauce contribute significant sodium to this dish. Always taste the sauce before adding any additional salt; in most cases, the existing seasoning is already balanced and sufficient.
- The leftovers are extraordinary. Like classic adobo, adobo sa gata tastes even more deeply flavored the next day, as the chicken continues to absorb the coconut-vinegar sauce overnight in the refrigerator.
How to Serve and Store
Serve chicken adobo sa gata immediately over freshly steamed white rice, allowing the creamy coconut sauce to pool generously over the grains. For a more complete Filipino meal, pair it with ensaladang talong (grilled eggplant salad) or steamed kangkong with bagoong for contrast. Garnish with a few sliced red chilies or a drizzle of coconut cream for a restaurant-quality presentation.
Store leftovers in an airtight container in the refrigerator for up to 3 days — note that the coconut milk sauce thickens considerably when chilled. Reheat gently on the stovetop over low heat, adding a small splash of water or coconut milk to loosen the sauce back to its original consistency. For longer storage, freeze for up to 6 weeks; thaw overnight in the refrigerator before reheating to prevent the sauce from separating.
Substitutions
- Coconut milk → Coconut cream — Produces a richer, thicker, more indulgent sauce; dilute slightly with water if it becomes too heavy.
- Soy sauce → Coconut aminos — A gluten-free, lower-sodium option with a slightly sweeter finish; ideal for gluten-sensitive diners.
- White cane vinegar → Rice vinegar — A milder, more delicate acidity that blends seamlessly with the coconut milk without overpowering it.
- Chicken → Pork belly — Cut into cubes, pork belly becomes meltingly tender during the braise and is a classic protein pairing for gata-based dishes.
- Fish sauce → Salt — A straightforward swap for those with fish allergies; adds sodium without the complex umami depth of patis.
- Green chilies → Red bell pepper — A zero-heat, budget-friendly substitute that adds sweetness and color without any spice.
Suggested Recipes
- Classic Chicken Adobo — The essential foundation dish that adobo sa gata builds upon; a must-know for any Filipino cook.
- Bicol Express — Pork slow-cooked in coconut milk with generous amounts of bird’s eye chilies; shares the same gata-forward spirit.
- Laing — Dried taro leaves braised in coconut milk with shrimp paste; another iconic Bicolano dish with similar creamy depth.
- Ginataang Manok — A simpler coconut milk chicken stew with ginger and lemongrass that showcases the versatility of gata in Filipino cooking.
Frequently Asked Questions

Jeff Smith
"Cooking is the intersection of history, science, and emotion."
For me, the kitchen has always been a laboratory of culture. With a background deeply rooted in digital strategy and precision, I approach the culinary arts with the same rigor I apply to the digital landscape—analyzing flavors, perfecting techniques, and documenting the nuance that makes Filipino cuisine truly world-class.
Findme Recipe was born from a desire to bridge the gap between traditional heritage and the modern home cook. Whether it is mastering the perfect balance of acidity in a classic Adobo or simplifying complex regional dishes for everyday kitchens, my mission is to preserve our culinary identity through accessible, data-backed, and delicious content.
I am not just building a database; I am cultivating a community where every Filipino kitchen feels empowered, every ingredient is celebrated, and every family heirloom recipe finds a place to thrive.
Join me as we translate the soul of our islands into recipes for the next generation.